 >
>
How to replace a Fitbit Versa 3 Motherboard
Is your Fitbit Versa 3 smartwatch not powering on or having issues with quick battery drain after being exposed to water? This guide shows you how to replace the motherboard in your Fitbit.
If you would prefer to read a written repair guide, check that out below. Or if the tool cost seems prohibitive for a one time repair and you would prefer that we complete this repair for you, check out our Repair Catalog to see if we offer repair services for this device.
Are you a business? We offer wholesale discounts on our repair services if you are sending numerous units in for repair or want to send us continuing batches of devices for repair on a regular basis. Contact our support team for more info Info@JoesGE.com (This email is only for wholesale inquiries, please contact Support@JoesGE.com for other inquiries).
_____________________________________________
🚥 Repair Difficulty: Moderate (Screen removal requires patience and a heat gun)
⏰ Time to complete: 1 hour
🛠 The tools and parts that you will need for this repair:
- A New Motherboard
- Thin Pry Tool for screen removal.
- Nylon Spudger Tool (For unlocking ribbon connectors and doing other tasks that require a non conductive tool)
- Heat Gun (A hairdryer can also do the trick)
- A T2 Screwdriver or our Repair Kit
- Some 704 RTV for all screen replacements or T8000 for everything else.
- Anti-Static Parts Organizer Mat (Not necessary, just useful)
_____________________________________________
1. Remove The Screen
The watch in the photos is a Fitbit Sense which is essentially the same as the Versa 3. If you notice any differences between your watch and the one in the photo, don't worry, the procedures are essentially the same for both watches.
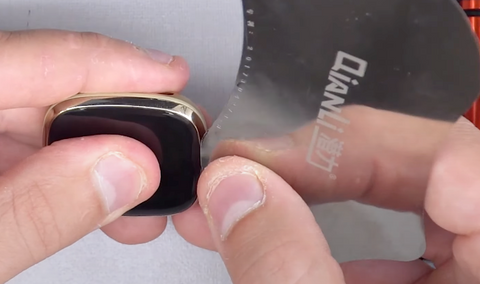
Heat the edge of the screen using your heat gun set to around 390F or 200C by going in circles around the whole edge of the screen, completing a couple of laps. Make sure to move quickly with the heat and not heat one area up too much as you risk damaging the screen or other components.

Starting on the side of the screen opposite from the side button, insert your thin pry tool and slowly work it around the edge of the screen. Make sure that you don't push it in too far as you could damage the screen ribbon cable.
It can be helpful to reheat the glue after your first lap around the edge of the screen.
Once the screen comes free, be careful of the ribbon cable that holds it in place.

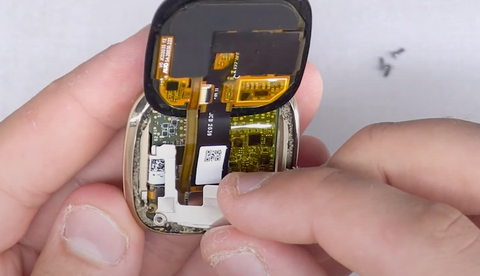
Before you can detach the screen from the motherboard you need to remove the silver cover which is held in place by two T2 screws.


With the cover removed you will be able to see the two ribbon connectors that connect the screen and NFC capabilities to the motherboard. You can gently pull the screen up and away from the motherboard to detach these connectors.

2. Remove the Old Motherboard
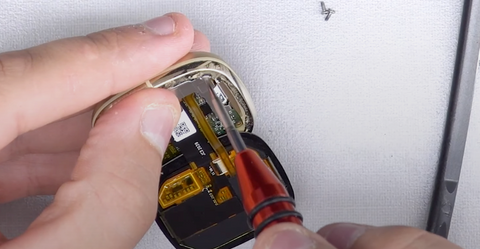
There are two remaining T2 screws in the corners of the motherboard that hold it and the battery in place. Remove these screws.

Using your nylon spudger tool, lift the 3 ribbon connectors up and away from the motherboard.

Use your nylon spudger to gently lift the battery away from the motherboard then working towards the corner with the ribbon cable coming out of it, lift the battery away from the motherboard.


3. Install The New Motherboard & Reassemble The Watch
Install the battery into the watch housing while making sure that the battery ribbon cable ends up on the left side of the heart rate monitor ribbon cable.

Place the motherboard over the top of the battery, being careful to ensure that all 3 ribbon cable connectors end up on top of the motherboard and not pinched between the housing and the motherboard or battery.

Once the motherboard is in its place, connect two of the ribbon cable connectors, leaving the battery connector disconnected.
Make sure that when you connect the ribbon cables, you lightly position the connector over its socket before applying pressure so as to ensure it is positioned properly to avoid damaging either the ribbon or the socket.

4. Reinstall the screen
Start by reinstalling a single screw into the motherboard to hold it and the battery in their places. Make sure that the screw is opposite of the side where the metal shield will go after the screen is installed.

Reconnect the two screen ribbon connectors to their sockets on the motherboard. Make sure that they are lined up well with the socket before applying any pressure so as to avoid damage to your device.

With the screen connected, you can now reconnect the battery. Doing this will activate the new screen and turn the Fitbit on.

You can now reinstall the metal shield over the screen connectors using the two T2 screws as well as add the second screw into the motherboard.

Your Fitbit should now be turned on or at least in the process of turning on and show something on the screen. If you do not see anything on the screen, place the watch on a charger for at least 5-10 minutes to see if it will turn on. If the screen still shows nothing, remove the screen connectors and check them for damage. If they are damaged, you will need to purchase either a new screen or motherboard or both depending on the extent of the damage.

Our housing did not have much left over adhesive and did not require cleaning because we recently glued this screen, if your screen has never been removed there will likely be some left over adhesive on the edge of the housing and the screen. Use your nylon spudger to gently scrape any remaining adhesive so that you have a clean surface for your new adhesive.
Once the surface is clean, put a thin line of glue all around the shelf on the housing of the Fitbit making sure that there are no gaps in the line to ensure water proofing.

Press the screen firmly into its place then apply pressure all around the edges of the screen. If any glue comes out of the edges, you can clean it off with a rag and rubbing alcohol.

Once the screen is seated and you know that the Fitbit is functioning properly, place the watch into a gentle clamp or wrap some rubber bands around it and let the glue cure for 24 hours before wearing it.
