 >
>
Apple Watch Series 7 Back Cover Replacement
Is the glass on the back of your Series 7 Apple watch cracked? Maybe the watch won't read your heart rate any more? Follow these steps to fix it!
🚥 Repair Difficulty:
Moderate/ 1.5-2 hours
Requires heat gun and has a lot of easily damageable ribbon cables.
Parts you'll need 🧰
(If the tool cost seems prohibitive, check out our Repair Catalog to see if we offer repair services for this device.)
- New back cover. Click the link then select your back cover from the drop down.
- Scroll on the product page to "Frequently bought together" to add all the tools you need as well.
- Or, select your back cover below if you only need the part.
Tools 🪛
_____________________________________________
1. Remove the screen
1.1: Using a heat gun set to 180°C (356°F) heat up the edge of the screen by quickly moving the hot air around the perimeter of it and the metal watch body. We spent about 1 minute and 40 seconds heating it up.
If you're using a hairdryer, be careful to not heat the center of the screen up very much.

1.2: Bend the edge of your thin pry tool over so that it has a slight downward angle to it. The edge of a table or a butter knife can be helpful with this.
This helps to protect the back side of the screen from damage.
1.3: Pour some rubbing alcohol onto the end of your thin pry tool. This will help break up the adhesive that holds the screen in place.

1.4: Stick the thin pry tool into the gap between the screen glass and the metal housing on the side of the watch with the Digital crown until it won't go any further. Then apply downward pressure to the pry tool.

Repeat these steps all the way around the watch, adding more rubbing alcohol after each pry until the screen lifts away.
When you lift the screen, be careful to not rip the ribbon cables!

2. Disconnect the Screen
2.1: There are two ribbon cables adhered to the back of the screen that have two connectors. Using some rubbing alcohol on the end of your nylon spudger, lift the start of cables away from the back of the screen.

2.2: Only lift the first part of the wires with the spudger, then move on to very carefully using your fingers to peel the ribbons up. When doing this, pull the ribbons back, parallel to the screen rather than straight out at a 90° angle from the screen.

2.3: Once the ribbons are free from the screen, use your spudger to lift the two small latches on the ribbon connectors then slide the cables out.

3. Remove the Battery
3.1: Put some isopropyl alcohol on the end of your spudger and dip it down into the gap between the battery and the taptic engine. Dip it in with alcohol on it 6-7 times and slide it around so that the alcohol is spread along the whole side.

3.2: Now use a small flat head screwdriver to lift the battery out of the watch. There is a metal housing over the battery that has a couple of tabs sticking out of the corners. Place the flat head under a tab one at a time and apply pressure. Go back and forth between the tabs until the battery lifts up.

3.3: The ribbon cable for the battery connects on the side of the battery. Use your nylon spudger to open the clasp, then slide the cable out.

4. Remove the Taptic Engine
4.1: There are three Y head screws holding the Taptic Engine in place. Remove them and make sure you don't lose them!

4.2: Use your plastic spudger to lift up the Taptic Engine from the back. It shouldn't be very secure in place once the screws are removed.

4.3: Use your spudger to lift the silver plug for the Taptic Engine so that you can set it aside.

5. Further Disassembly
5.1: Disconnect these 3 remaining connectors

5.2: Remove the 4 screws, 1 in each corner using your Y tip screwdriver. Two of them are hidden under black tape. The other two are holding in a small metal bracket. Make sure to keep all of these screws organized.

5.3: Give this ribbon cable a gentle pull to detach it from the inside wall of the housing. Don't pull it entirely off the bottom of the housing, just off of the wall.

6. Removing the Back Cover
6.1: Using your heat gun set to 180°C (356°F) heat up the perimeter of the back glass for around 60 seconds.

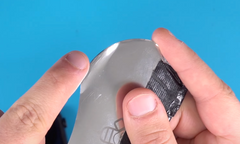
6.2: Using a 1.5mm flat head or other small screwdriver, press down on the 4 corners where you removed the screws while holding the housing off of whatever surface you are working on (You may need to let the housing cool down for a bit before doing this). A bit of pressure in each corner one after the other will eventually work the back cover loose.
Be very careful to not press on any circuit boards, only in the hole where the screw used to be in each corner. The screwdriver should make contact with the threaded part of the back cover through each metal bracket.

6.3: Once the back cover starts to give, you can apply some rubbing alcohol to the sharp end of your spudger and push it into the gap between the back cover and the metal housing and work your way around the back cover prying it off.

6.4: Once the back cover is free, use your spudger to lift the ribbon connector out of it's socket.

6.5: Be very careful to not damage this water sealing gasket. If it is damaged you would need to make a new one from RTV glue or something else water tight. 
6.6: Clean the inside of the apple watch using a microfiber and rubbing alcohol or a Q tip and alcohol, being careful to not damage the gasket around the perimeter of the watch.

7. Install the New Back Cover
7.1: Line up the ribbon connector with the socket on your new back cover then very carefully use your spudger or screwdriver to push the connector into the socket. There will be a very gentle snap once it goes into place but it should not take much pressure. It has to be lined up perfectly to slide into place.

7.2: Apply gentle pressure to the back cover to align it with the housing. You will know that its in the right place when you can see that all four corner screw holes are lined up inside of the housing.


7.3: Install the silver bracket and the two screws that hold it in place.


7.4: Install the two screws in the corners opposite of the bracket that you just installed.

7.5: Reconnect the ribbon connectors inside the housing of the watch.


8. Install the Taptic Engine
8.1: Connect the ribbon cable into its socket on the motherboard. This connector is very similar to the style used to connect the back cover. Be gentle, make sure to line it up correctly and don't apply too much pressure as it could be damaged easily.

8.2: Press the black cover back towards the Taptic Engine so that it's out of the way then re install the 3 screws that hold the Taptic Engine in it's place.


9. Install the Battery
9.1: Slide the ribbon cable back into it's connector on the side of the battery then use your plastic spudger to lock the latch.

9.2: Line the battery up in it's place then use two fingers to press it back onto the adhesive inside of the watch. If the adhesive is no longer sticky, you can remove it and replace it with a thin double sided tape.

10. Reinstall the Screen
10.1: Clean the rim of the housing where the screen will sit and the edge of the screen with rubbing alcohol on a Q tip to remove any leftover adhesive. You may need to use your plastic spudger to scrape off the old adhesive if it won't come off easily.


10.2: Use your fingers or a set of fine tweezers to peel the black tape off of the two screen ribbon cables. Be very gentle as the cables can be easily damaged.

10.3: Gently slide the two ribbons into their connectors on the back of the screen then close the latches to lock them in place. Be very gentle when sliding them in and make sure that they are lined up perfectly or your screen and touch functions will not work properly.

10.4: Use your nylon spudger to gently press the black tape over the two ribbon latches and secure it to the back of the screen.
At this point, it would be good to carefully plug the watch into charge and confirm that the screen and touch functions are working. If they are, proceed to the next step. If they aren't you may need to reposition the ribbon cables for the screen in their latches.

10.5: Spread a thin line of your 704 RTV around the inside lip of the metal housing where the screen will sit. Make sure that the line is connected around the entire housing to ensure water tight sealing.
Be careful to not get any adhesive on the ribbon cables that connect the screen.

10.6: Set the screen into its groove in the housing then apply gentle even pressure for 10 seconds to seat it into it's place.

10.7: Using a Q tip, remove any adhesive that spilled out onto the edge of the screen and housing, then wrap a rubber band around the screen and watch and leave it to cure for 24 hours.


11. Get back to enjoying your gear 🤓
If you have any questions in regards to this repair, feel free to shoot us an email or text and we will do our best to reply to you as quickly as possible. Please inquire using our Repair Catalog if you are wondering how much a certain repair will cost. If you do not see your item in our repair catalog, it means that we do not offer repair services for it.
💬 360.362.1722