 >
>
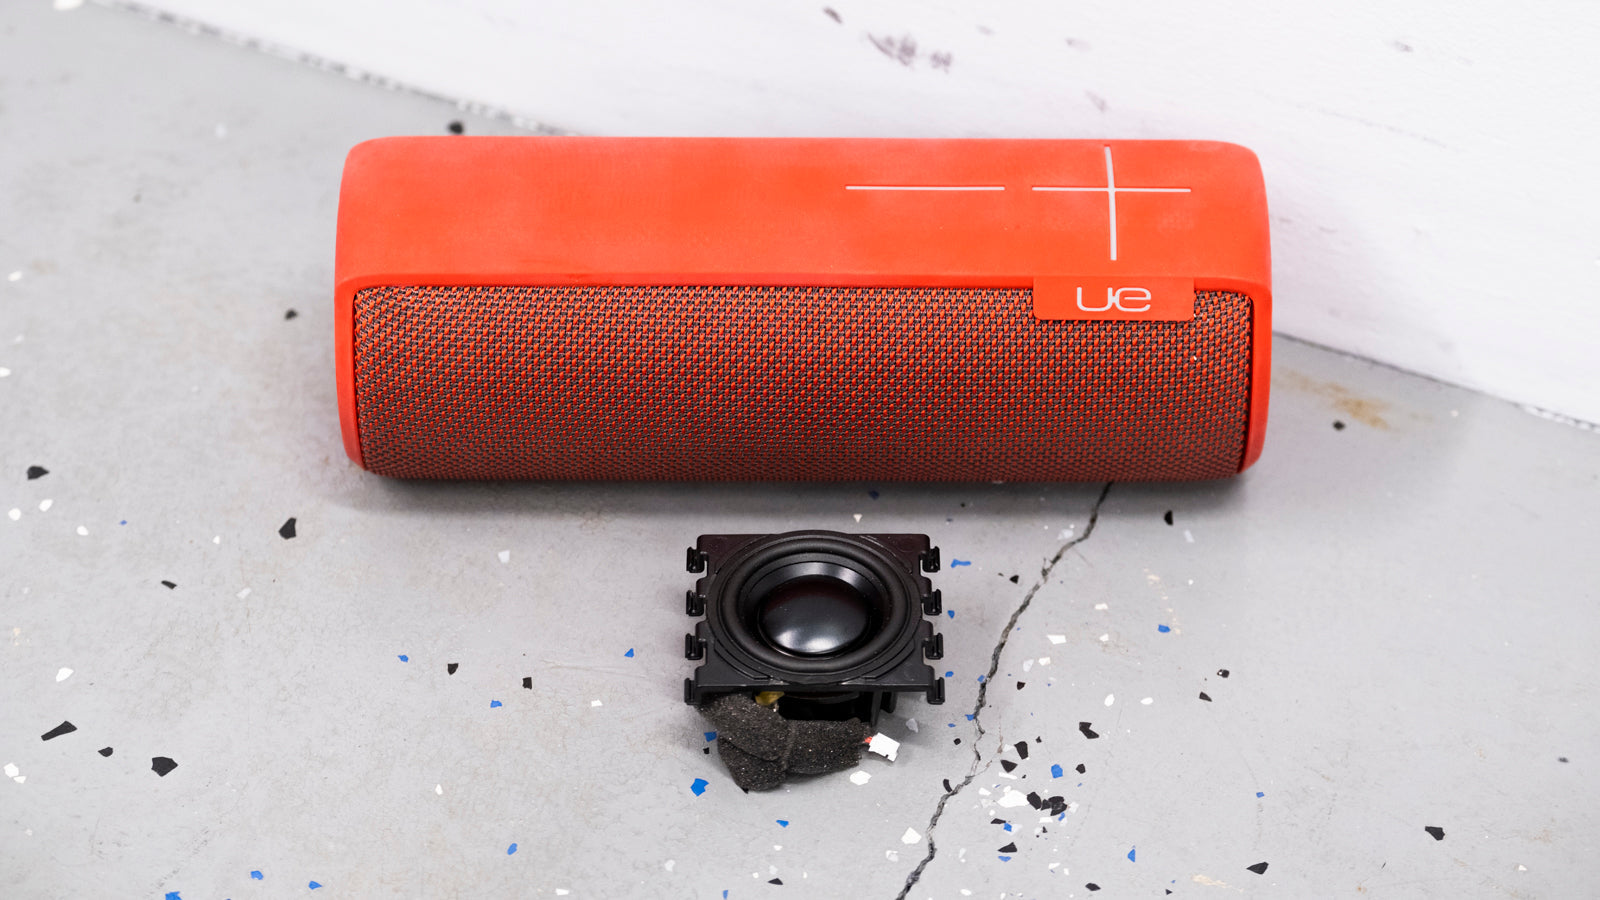
How to Replace A Blown UE Megaboom Speaker Driver
The UE Megaboom is one of the most durable speakers that we have ever tested, however, it is still possible to blow the speaker drivers if you jam really hard all the time. We sell replacement speakers and this guide shows how to install a new speaker driver.
Note: This process is slightly different for the Megaboom 3 and we have a video showing how to replace that speaker Here.
If you would prefer to read a written repair guide, check that out below. Or if the tool cost seems prohibitive for a one time repair and you would prefer that we complete this repair for you, check out our Repair Catalog to see if we offer repair services for this device.
Are you a business? We offer wholesale discounts on our repair services if you are sending numerous units in for repair or want to send us continuing batches of devices for repair on a regular basis. Contact our support team for more info Info@JoesGE.com (This email is only for wholesale inquiries, please contact Support@JoesGE.com for other inquiries).
_____________________________________________
Repair Difficulty: Difficult
Time to complete: 1-2 hours. This is an intricate repair, take it slow and give yourself plenty of time :)
The tools and parts that you will need for this repair:
- A New Replacement Speaker Driver
- Small and Large flat head screwdrivers in our Repair Kit
- Pliers
_____________________________________________
1. Remove the spine and cloth cover
Before beginning this repair, make sure to mark which speaker is faulty. There are two speaker drivers within the Megaboom and two passive radiators that are not electrified but simply move as the air pressure changes inside of the Megaboom. The passive radiators can rip which causes an air leak that will sound like a blown speaker. If you put your ear next to the actual speaker drivers and they both sound fine but just below them, a buzzing sound is happening, then you likely have a torn passive radiator.
Insert your large flat screwdriver into the gap between the bottom rubber of the speaker and the cloth and pry up gently. Pry up on the center of both sides of the rubber one after the other and it will come loose.

Work your way down each side of the spine from the bottom of the speaker to the top, gently prying away the rubber spine until you hear it detach from its clips.

With only the top part of the rubber spine still attached, start removing the fabric at the bottom of the speaker. Insert your screwdriver under the plastic lip of the cloth and pry upwards. This will take some time but eventually, you will be able to unclip and remove the fabric from the bottom of the speaker.


Now fold the fabric down so that you expose these holes along the top side edge of the speaker.

Insert your large flat head screwdriver into the holes to pry the top rubber piece and fabric up and out of the black plastic housing.

2. Remove the speaker grill
Remove the plastic speaker grill cover from the side with a faulty driver by prying it up gently with your large flat screwdriver.

3. Remove the charge port and button boards
Insert your flat head screwdriver into the small gap between the round charger port assembly on the side of the speaker opposite from where the rubber spine was and pry the plastic assembly off of the main body of the speaker. Make sure to document the direction that you will need to reinstall the charge port board in so that you do not damage the connection when reinstalling the board.

Repeat this process for the button board on the other end of the speaker, once again, making sure to document the position of the button board so that you do not install it the wrong way.

4. Remove the locking pins
Remove both of the metal locking pins by pushing them out partway with your Small Flat Edge Screwdriver then grab them with your pliers to pull them out the rest of the way.


5. Replace the speaker
Now the speaker driver will only be held in by some clips and it can be easily removed by prying it up with your flat head screwdriver.

Once the speaker is loose, you can disconnect the plug on the end of the speaker wires by pulling it straight out from the connector.

Plug the New Replacement Speaker Driver into the plug and snap it into the speaker housing.

6. Replace the grills and boards
Slide the two locking wires into their spots. You can use your Small Flat Edge Screwdriver or pliers to push them in the last bit.

Snap the speaker grill into place.

Snap the charger board assembly back into place. ***Be very careful when reinstalling this assembly. There are two connections that need to be lined up properly with the connections inside of the speaker. If you damage these connections, the speaker will not work. Once you have them lined up properly, apply force all around the edges of the assembly to snap it into place.

Repeat this process for the button board, ensuring that it is lined up properly before applying heavier force to lock it into place.

7. Reassemble the cloth and spine
Line up the plastic edge of the fabric with the edge of the speaker housing where the spine will be covering. Make sure to have it the right way round as there are different sized snap connectors on each end of the fabric.


Once you have it lined up properly, you can apply pressure to snap the connectors into place.

Now, wrap the fabric around the speaker so that the plastic connector on the other end of the fabric is lined up the snap connectors. Then, apply pressure to lock it into place.

Now fold the plastic end pieces down into the round ends of the speaker.

Apply pressure to the inside of the fabric to make sure that it is tightly secured in place.

Line up the rubber spine and snap it into place on the top of the speaker then apply pressure to the side of it where the volume buttons are and work your way down to the bottom of the speaker snapping the rubber into place.
