 >
>
JBL Link 10 Charger Port Board Replacement Tutorial
Is your JBL link 10 speaker not charging? This guide shows you how to replace the charging port board in a few simple steps.
If you would prefer to read a written repair guide, check that out below. Or if the tool cost seems prohibitive for a one time repair and you would prefer that we complete this repair for you, check out our Repair Catalog to see if we offer repair services for this device.
Are you a business? We offer wholesale discounts on our repair services if you are sending numerous units in for repair or want to send us continuing batches of devices for repair on a regular basis. Contact our support team for more info Info@JoesGE.com (This email is only for wholesale inquiries, please contact Support@JoesGE.com for other inquiries).
_____________________________________________
Repair Difficulty: Easy
Time to complete: 30 minutes
The tools and parts that you will need for this repair:
- A New Charge Port PCB
- Strong Pry Tool (a guitar pick, or the dull side of a butter knife can also do the trick)
- A Small Phillips Screwdriver
_____________________________________________
1. Remove The Rubber Bottom
The rubber piece on the bottom of the speaker is held on with adhesive. Simply pull up from the edge of it until it comes free from the housing. Do you best to preserve the adhesive so that you do not need to apply new adhesive on the rubber cover.

 a
a
2. Remove the Charge Port Housing
Using your Small Phillips Screwdriver, remove the four screws in the corners of the bottom cover. If the screw gets stuck under some of the adhesive, thats fine, so long as its loose enough to remove the cover.


Using your Pry Tool or something similar, gently pry the plastic bottom piece of the speaker away from the cloth center. Be careful of the wires that are attached to the plastic piece.


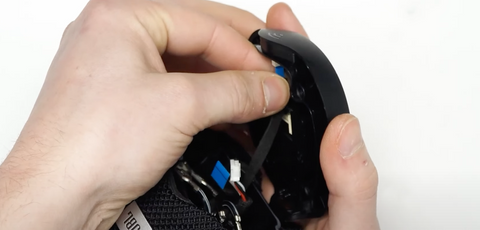
3. Remove the Charge Port
Disconnect the 3 wires that are plugged into the plastic base by pulling them straight out from their connectors. It may be helpful to take a photo of the direction that the connectors are plugged in for use in reconnecting them later on.
Remove the remaining two screws from the charge port PCB cover.

Remove the PCB from its slot by either prying it up on the edges with your screwdriver or pushing it out of the housing from the other side then slide it out of the housing.


4. Replace the Charge Port PCB
Insert the new PCB into its place by wiggling the charging port into its spot then, press the board down into place.


Replace the PCB cover and two screws.

Reconnect the 3 wires to their connectors. The blue tipped flat ribbon cable needs to be reconnected facing a certain direction, make sure the contacts are facing the right way or the speaker will not work. It could be helpful to watch this step in The Repair Video.

5. Replace the bottom cover
Secure the plastic bottom cover onto the speaker, and replace the 4 screws that hold it in place.

Re-apply the rubber piece making sure to replace it in the proper direction. There is a notch out of one side of the rubber that matches up with a ridge on the plastic housing.


6. Get back to enjoying your gear 🤓