![Apple AirPod Max [A2096] - How to Replace the Left Speaker](http://www.joesge.com/cdn/shop/articles/Airpod_Max_L_Speaker_4cb6d8d6-e5ee-46ee-9935-d97ae1150ce9_1800x900.png?v=1748882601) >
>
Apple AirPod Max [A2096] - How to Replace the Left Speaker
A malfunctioning left speaker on your AirPods Max can disrupt your audio experience, causing distorted or no sound. This guide will walk you through replacing the left speaker. Restore your AirPods Max’s functionality with our step-by-step tutorial.
🚥 Repair Difficulty:
Moderate / 20 minutes
This repair involves delicate prying and handling of small screws, requiring precision. It’s rated Moderate due to the need for specific tools like a pentalobe screwdriver.
Parts you'll need 🧰
Tools you'll need 🪛
If the tool cost seems prohibitive, check out our repair catalog to see if we offer repair services for your device. If it's not listed, we don't repair it.
Double-Sided Tape
Steps to Repair your Apple AirPods Max
If the repair process is daunting, check out our repair catalog to see if we offer repair services for your device. If it's not listed, we don't repair it.
Step 1: Remove the Left Earpad and Unlock the Speaker Housing
1.1 Gently remove the left earpad by pulling it away from the AirPods Max.

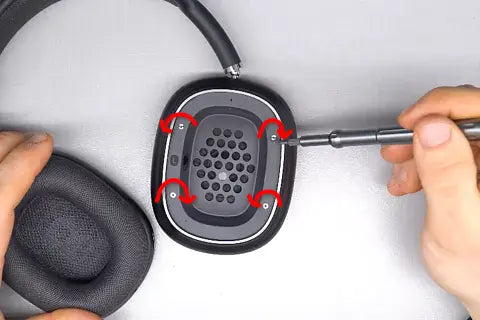
1.2 Use the 50-in-1 Repair Kit with a Pentalobe 1.2 bit to turn the four pentalobe screws in specific directions: top right (right), bottom right (left), bottom left (right), top left (left). Apply a quarter turn with minimal pressure to unlock them.
Step 2: Pry Open the Speaker Housing
2.1 Using a Flexible Pry Tool, carefully insert it between the plastic and metal edge of the speaker housing to separate the double-sided tape.

2.2 Gently pry up and work around the housing, applying minimal pressure to avoid damaging the plastic, until it pops open.

2.3 Lift the housing sideways and flip it out, being careful not to pull the ribbon cable fully out.

Step 3: Remove the Speaker Screws and Lift the Speaker
3.1 Using the 50-in-1 Repair Kit with a Flathead 2.0 bit, unscrew the flathead screw by pushing it out initially, then unscrewing normally.

3.2 Switch to the T4 Torx bit in the 50-in-1 Repair Kit and unscrew the three remaining Torx screws.

3.3 Carefully lift the speaker from the top, avoiding pulling on any ribbon cables, and note the two-pin connection.


Step 4: Install the New Speaker
4.1 Place the new speaker by aligning the two-pin connector side first, then lowering the other side to match the screw holes.

4.2 Using the 50-in-1 Repair Kit with a Flathead 2.0 bit, start screwing in the flathead screw to secure the speaker, ensuring it aligns properly.

4.3 Switch to the T4 Torx bit in the 50-in-1 Repair Kit and partially screw in the three Torx screws to hold the speaker in place without tightening fully.

4.4 Tighten all four screws (flathead and Torx) fully, applying minimal torque until they stop, to secure the speaker evenly.

Step 5: Reapply Double-Sided Tape and Close the Housing
5.1 Using a Flathead 2.0 bit from the 50-in-1 Repair Kit, press the new double-sided tape down firmly to ensure adhesion.

5.2 Peel off the top film of the new tape to expose the adhesive, then evenly press the housing back into place on the AirPods Max.


Step 6: Secure the Housing and Reattach the Earpad
6.1 Using the 50-in-1 Repair Kit with a Pentalobe 1.2 bit, screw in the four pentalobe screws in reverse order: top right (left), bottom right (right), bottom left (left), top left (right). Apply a quarter turn with minimal pressure.

6.2 Gently press the left earpad back onto the AirPods Max to secure it in place.

Step 7: Get back to enjoying your gear 🤓
7.1 Inspect the left speaker housing and earpad to ensure they are securely attached, test the new speaker by playing audio to confirm clear and balanced sound, and enjoy your fully functional AirPods Max with restored audio quality.

If you have any questions in regards to this repair, feel free to shoot us an email or text and we will do our best to reply to you as quickly as possible. Please inquire using our Repair Catalog if you are wondering how much a certain repair will cost. If you do not🛒 see your item in our repair catalog, it means that we do not offer repair services for it.
💬 360.362.1722
Leave a comment